Blog

Can You Grow Glutes Without Gym Equipment?

Building strong, well-defined glutes is a goal for many fitness enthusiasts. While gym equipment like barbells and resistance machines is often seen as essential for this purpose, it is entirely possible to achieve impressive glute growth without stepping foot in a gym. Let’s explore how you can effectively target and grow your glutes using just your body weight and minimal equipment.

Understanding Glute Anatomy

Before diving into exercises, it’s important to understand the anatomy of the glutes. The gluteal muscles consist of three main components:

  1. Gluteus Maximus: The largest muscle, responsible for hip extension and providing shape to the buttocks.
  2. Gluteus Medius: Located on the outer surface of the pelvis, it helps with hip stabilization and abduction.
  3. Gluteus Minimus: The smallest glute muscle, also involved in hip stabilization.

To effectively grow your glutes, it’s essential to engage all three muscles through varied movements.

Effective Bodyweight Exercises for Glute Growth

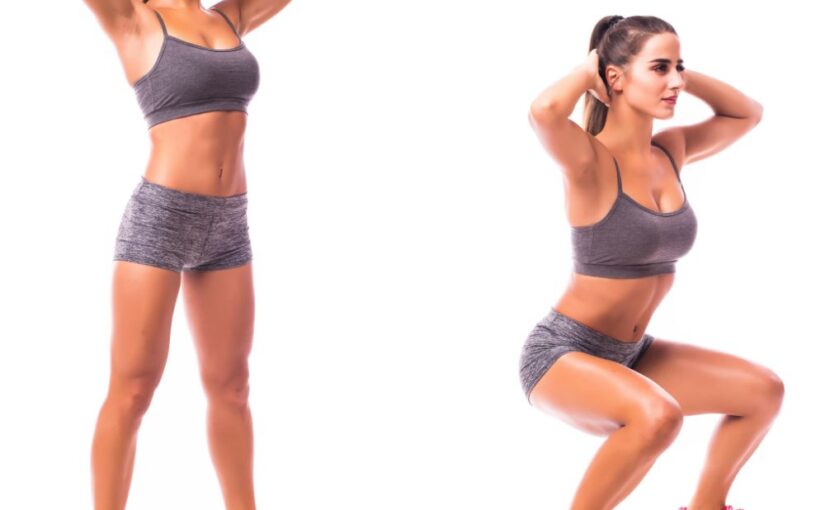
  1. Squats: Bodyweight squats are a well-known exercise for training the glutes. Stand with your feet shoulder-width apart, lower your body as if sitting back in a chair, and push through your heels to return to standing. Variations like sumo squats can further engage different parts of the glutes.
  2. Lunges: Lunges are excellent for glute activation. Step forward with one leg, lowering your hips so that both knees are bent at about 90 degrees. You can also try reverse lunges or side lunges to hit your glutes from different angles.
  3. Glute Bridges: Lie on your back, legs bent and feet flat on the floor. Lift your hips to the ceiling, squeezing your glutes at the top. Hold for a moment before lowering back down. For added intensity, try single-leg glute bridges.
  4. Donkey Kicks: Start on all fours, with your hands under your shoulders and knees under your hips. Lift one leg towards the ceiling while maintaining the knee bent, contract your glutes at the top. Go back to your starting position and repeat on the other side.
  5. Fire Hydrants: Similar to donkey kicks, start on all fours but instead of kicking back, lift your leg out to the side, keeping the knee bent. This movement targets the gluteus medius and helps with hip stabilization.
  6. Step-Ups: Use a sturdy platform or step. Step up with one foot, driving into the heel, then bring the other up to meet it. Step back down and repeat. This exercise mimics the motion of climbing and effectively targets the glutes.
  7. Bulgarian Split Squats: Elevate one foot on a bench or chair behind you. Lower your body into a squat with the front leg, focusing on keeping your chest upright and your front knee over your ankle. This move is fantastic for isolating the glutes.

Tips for Maximizing Glute Growth Without Equipment

  1. Mind-Muscle Connection: Focus on contracting your glutes during each exercise. A strong mind-muscle connection can enhance activation and promote growth.
  2. Increase Reps and Sets: Without equipment, increasing the number of repetitions and sets can help create enough stimulus for muscle growth. Aim for 3 to 4 sets of 12 to 20 repetitions for each exercise.
  3. Add Variations: Keep your workouts fresh by incorporating different variations of exercises. This can prevent plateaus and target the muscles from different angles.
  4. Tempo Training: Slow down the movement, particularly during the eccentric (lowering) phase. For example, take 3 seconds to lower into a squat and 1 second to rise. This increases time under tension, promoting muscle growth.
  5. Incorporate Plyometrics: Jump squats, lateral jumps, and other plyometric exercises can add intensity and power to your workouts, engaging the glutes effectively.
  6. Consistency is Key: Just like with any workout routine, consistency is crucial for seeing results. Aim to perform glute-focused workouts at least 2-3 times per week.

Conclusion

Growing your glutes without gym equipment is not only possible, but can also be incredibly effective. By utilizing bodyweight exercises, focusing on proper form, and maintaining consistency, you can achieve impressive results. Remember to engage all parts of the glutes and keep your workouts varied to avoid plateaus. So, if you’re ready to enhance your glute game, grab a mat and start moving—your glutes will thank you!

Do Cable Kickbacks Build Stronger Glutes?

When it comes to sculpting and strengthening the glutes, many gym-goers are constantly on the lookout for the most effective exercises. Among the plethora of options available, cable kickbacks have gained popularity as a go-to exercise for targeting the glute muscles. But are they truly effective? Let’s delve into the mechanics of cable kickbacks and examine their benefits for glute development.

What Are Cable Kickbacks?

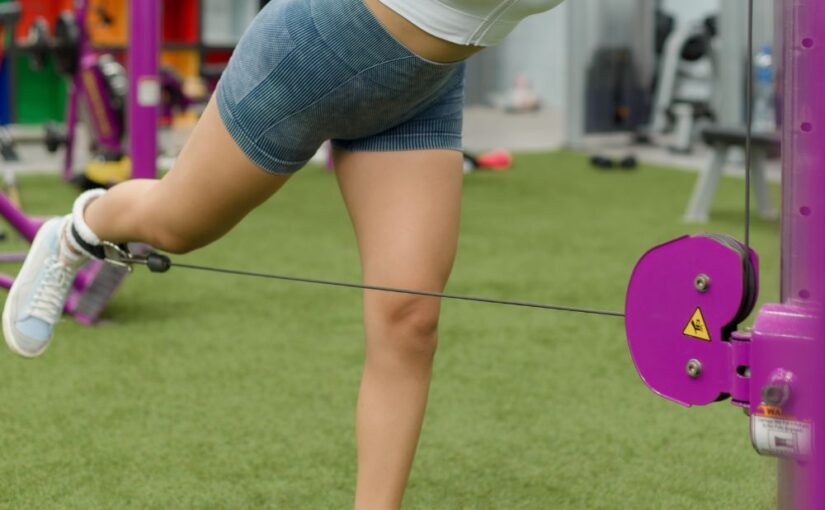
Cable kickbacks involve using a cable machine with an ankle strap attachment. The exercise is performed by extending one leg backward while keeping the knee straight and the core engaged. This movement specifically targets the gluteus maximus, the largest muscle in the glute group, making it a prime candidate for muscle building and toning.

The Mechanics of the Exercise

The effectiveness of this exercise hinges on several factors:

  1. Targeted Muscle Activation: Cable kickbacks primarily engage the gluteus maximus. By focusing on this muscle during the movement, you create a strong mind-muscle connection, which can lead to improved muscle growth over time.
  2. Range of Motion: The cable machine allows for a controlled movement, enabling a full range of motion. This is essential for maximizing muscle activation. As you extend your leg, the cable provides constant tension, which is beneficial for muscle growth.
  3. Versatility: Cable kickbacks can be easily adjusted in terms of weight and resistance, making them suitable for both beginners and advanced lifters. You can modify the weight to suit your fitness level, allowing for progressive overload, which is crucial for building muscle.

Benefits

  1. Isolated Glute Activation: Unlike many compound exercises that involve multiple muscle groups, cable kickbacks isolate the glutes, making them particularly effective for those looking to enhance glute shape and size.
  2. Reduced Strain on Lower Back: Because the exercise is performed in a bent-over position while holding onto the machine for support, it minimizes strain on the lower back compared to other glute exercises like deadlifts.
  3. Improved Balance and Stability: Cable kickbacks require stabilization throughout the movement, which can improve overall balance and coordination. This can be beneficial for athletes and anyone looking to enhance their functional strength.
  4. Versatile Training: Cable kickbacks can be incorporated into various workout routines, from strength training to high-intensity interval training (HIIT). They can also be modified to target other muscles, such as the hamstrings and core, by adjusting the leg position.

How to Perform Correctly

To ensure you’re getting the most out of cable kickbacks and avoiding injury, follow these steps:

  1. Set Up the Machine: Attach the ankle strap to the low pulley of the cable machine. Adjust the weight to a manageable level.
  2. Position Yourself: Stand facing the machine, and strap the ankle attachment to your ankle. Hold onto the machine for support.
  3. Start the Movement: Keeping your knee straight and core engaged, extend your leg backward in a controlled manner. At the top of the exercise, contract the glutes and hold for a couple of seconds. 
  4. Return Slowly: Bring your leg back to the starting position without letting the weight stack touch, maintaining tension in the muscles.
  5. Repetitions: Aim for 3 sets of 12-15 repetitions per leg, ensuring proper form throughout.

Conclusion

Cable kickbacks are an effective exercise for targeting the glutes, particularly when performed with proper form and intensity. While they should be part of a well-rounded fitness routine that includes a variety of exercises, cable kickbacks can play a significant role in building strength and enhancing the shape of your glutes. Ultimately, consistency and progression are essential, as with any exercise. So, if you’re looking to elevate your glute game, consider adding cable kickbacks to your workout regimen!

Best Gym Equipment for Stronger Glutes

Building strong, toned glutes is a common fitness goal for many, and the right gym equipment can significantly aid in achieving this target. The gluteal muscles, comprised of the gluteus maximus, gluteus medius, and gluteus minimus, play a crucial role in movement and stability. In this article, we’ll provide an overview of the glute muscles and explore the best gym equipment to develop them, including recommended rep ranges for optimal growth.

Overview of the Glute Muscles

  1. Gluteus Maximus: The largest muscle in the glute group, responsible for hip extension, external rotation, and overall power during movements like squats and deadlifts.
  2. Gluteus Medius: Located on the outer surface of the pelvis, this muscle stabilizes the hip and pelvis during walking and running. It also aids in hip abduction.
  3. Gluteus Minimus: The smallest of the three, this muscle lies beneath the gluteus medius and assists in hip stabilization and abduction.

Rep Ranges for Glute Growth

For hypertrophy (muscle growth), aim for a rep range of 8 to 12 repetitions per set. Incorporating heavier weights with lower reps (4 to 6) can also build strength, while higher reps (15 to 20) with lighter weights can enhance muscular endurance. Mixing these ranges in your training program will ensure comprehensive glute development.

Best Gym Equipment for Glutes

1. Barbells

Why They’re Effective: Barbells are versatile and excellent for building strength in the glutes through heavy lifts.

Recommended Exercises:

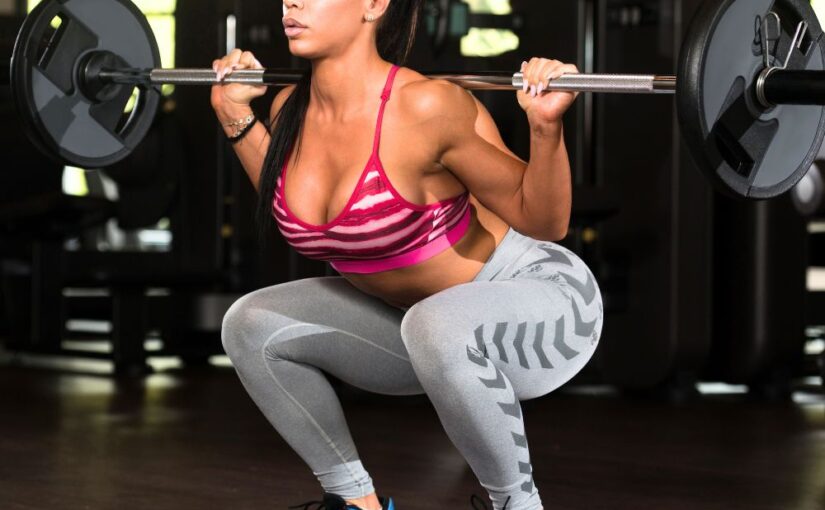
  • Barbell Squats: Engages the glutes, quads, and hamstrings.
  • Barbell Hip Thrusts: Primarily targets the glutes and allows for heavy loading.

2. Dumbbells

Why They’re Effective: Dumbbells enable a wide range of movements and are great for isolating glute muscles.

Recommended Exercises:

  • Dumbbell Lunges: Targets glutes while engaging the legs.
  • Dumbbell Step-Ups: Focuses on the glutes and promotes balance.

3. Resistance Bands

Why They’re Effective: Bands are portable and add resistance, ideal for warming up or intensifying glute-focused exercises.

Recommended Exercises:

  • Banded Glute Bridges: Activates the glutes with added resistance.
  • Banded Side Steps: Targets the gluteus medius.

4. Smith Machine

Why It’s Effective: Offers stability for heavy lifts and is helpful for maintaining proper form.

Recommended Exercises:

  • Smith Machine Squats: Similar to barbell squats, with added safety.
  • Smith Machine Hip Thrusts: Focuses on glute development.

5. Leg Press Machine

Why It’s Effective: Isolates the glutes and legs without the need for balancing a barbell.

Recommended Exercises:

  • Leg Press: Adjust foot placement to emphasize glute engagement. Place your feet higher and shoulder-width apart on the platform.

6. Cable Machines

Why They’re Effective: Provide constant tension on the muscles, enhancing glute activation.

Recommended Exercises:

  • Cable Kickbacks: Isolates the glutes effectively.
  • Cable Side Lateral Raises: Targets the gluteus medius.

7. Stability Ball

Why It’s Effective: Engages the core while targeting the glutes, promoting stability.

Recommended Exercises:

  • Stability Ball Glute Bridges: Adds instability to the movement, increasing muscle engagement.
  • Stability Ball Squats: Enhances balance and glute activation.

8. Plyometric Boxes

Why They’re Effective: Useful for explosive movements that engage the glutes.

Recommended Exercises:

  • Box Jumps: Build power and engage the glutes.
  • Step-Ups with a Knee Raise: Focus on glute engagement while improving coordination.

Conclusion

To effectively build and strengthen your glutes, a variety of gym equipment should be incorporated into your workout routine. Understanding the anatomy of the glute muscles and implementing a range of rep schemes will maximize your training results. By using equipment like barbells, dumbbells, and resistance bands, you can create a comprehensive program that promotes glute growth and strength. Focus on proper form and gradually increase weights to keep challenging your muscles for optimal results.

Can Dumbbells Build Muscle and Strength Effectively?

When it comes to strength training, dumbbells are a popular choice for many fitness enthusiasts. They offer versatility, convenience, and the ability to perform a wide range of exercises. However, a common question arises: are dumbbells enough to build muscle and strength? This article explores the effectiveness of dumbbells in achieving these fitness goals and offers insights into maximizing their benefits.

The Benefits of Dumbbells

1. Versatility

Dumbbells allow for a wide variety of exercises targeting different muscle groups. From traditional lifts like bench presses and squats to isolation movements such as bicep curls and tricep extensions, dumbbells can effectively work all major muscle groups. This versatility makes them suitable for both beginners and experienced lifters.

2. Improved Muscle Activation

Using dumbbells requires greater stabilization than using a barbell, as each arm works independently. This independence can enhance muscle activation and promote balanced strength development, helping to prevent muscle imbalances.

3. Range of Motion

Dumbbells provide a greater range of motion compared to fixed machines. This flexibility allows for more natural movement patterns, which can lead to better muscle engagement and overall effectiveness during workouts.

4. Accessibility

Dumbbells are relatively affordable and can be easily stored at home, making them an accessible option for many people. Whether at the gym or in a home workout space, they can be used effectively to achieve fitness goals.

Building Muscle and Strength with Dumbbells

1. Progressive Overload

To build muscle and strength, you must apply the principle of progressive overload. This involves gradually increasing the weight you lift, the number of repetitions, or the intensity of your workouts. Dumbbells can accommodate this principle well, as you can easily adjust the weights to continue challenging your muscles.

2. Training Volume and Frequency

To effectively build muscle and strength, it’s important to consider training volume (the total amount of work done) and frequency (how often you train). With dumbbells, you can structure your workouts to include multiple sets and repetitions, allowing for sufficient volume to stimulate growth.

3. Incorporating Compound and Isolation Exercises

Dumbbells are effective for both compound and isolation exercises. Compound movements, such as dumbbell squats and chest presses, engage multiple muscle groups and are great for building overall strength. Isolation exercises, like lateral raises and tricep kickbacks, target specific muscles and can help enhance muscle definition.

Limitations of Dumbbells

While dumbbells are a powerful tool for building muscle and strength, they do have some limitations:

1. Weight Capacity

Dumbbells have a weight limit compared to barbells or weight machines. If you reach a point where the available dumbbell weights are no longer challenging, it may hinder further strength gains.

2. Stability Challenges

While the independence of dumbbells can enhance muscle activation, it can also pose stability challenges for beginners. Those new to strength training may struggle with form or experience difficulty with certain movements.

3. Imbalances

If one side of your body is stronger than the other, using dumbbells can highlight these imbalances. While this can be beneficial for correcting them, it may initially lead to frustration if one side fatigues more quickly.

Combining Dumbbells with Other Equipment

To maximize muscle and strength gains, consider combining dumbbells with other training modalities:

  • Barbells: Incorporating barbell exercises can allow for heavier lifting, particularly for lower-body and compound movements.
  • Resistance Bands: Bands can add resistance and variety to your workouts, enhancing muscle activation and promoting stability.
  • Bodyweight Exercises: Integrating bodyweight movements, such as push-ups and pull-ups, can complement dumbbell training and provide functional strength.

Conclusion

Dumbbells are indeed an effective tool for building muscle and strength. Their versatility, ability to promote muscle activation, and ease of use make them suitable for various fitness levels. By applying the principles of progressive overload, focusing on training volume, and incorporating a mix of compound and isolation exercises, you can achieve significant strength and muscle gains using dumbbells. However, to optimize results, consider combining them with other training equipment and modalities for a well-rounded strength-training program.

Do Accessory Lifts Build Strength or Hypertrophy

When it comes to strength training, the debate surrounding the role of accessory lifts often arises. Many lifters focus primarily on compound movements, such as squats, deadlifts, and bench presses, which are known for building strength. However, accessory lifts—exercises that target specific muscle groups and complement compound lifts—also play a critical role in any training regimen. This article explores whether accessory lifts contribute primarily to gaining strength, hypertrophy, or both.

Understanding Accessory Lifts

Accessory lifts are exercises that target specific muscles or movement patterns. They are typically lighter in weight and designed to support the primary lifts by improving muscle imbalances, enhancing stability, and increasing overall muscle endurance. Examples of accessory lifts include:

  • Bicep curls
  • Tricep extensions
  • Lunges
  • Dumbbell rows
  • Shoulder raises

Accessory Lifts for Hypertrophy

1. Muscle Growth

Accessory lifts can significantly contribute to hypertrophy, which is the increase in muscle size. These exercises isolate specific muscles, allowing for targeted fatigue and greater muscle damage, both of which are key factors in muscle growth. By incorporating accessory lifts into a workout routine, you can ensure that all muscle groups are adequately stimulated, leading to balanced development.

2. Increased Time Under Tension

Many accessory lifts allow for greater time under tension (TUT), a critical factor in hypertrophy. By performing exercises with controlled movements and higher repetitions, lifters can create more metabolic stress on the muscles, further promoting growth.

3. Variety in Training

Incorporating accessory lifts can add variety to a training program, preventing monotony and keeping workouts engaging. This variety can help avoid plateaus in muscle growth by continually challenging the body in different ways.

Accessory Lifts for Strength

1. Supporting Compound Lifts

While accessory lifts are often associated with hypertrophy, they also play a crucial role in developing strength. Many accessory exercises focus on stabilizing and strengthening the muscles involved in compound lifts. For example, strengthening the hamstrings through deadlifts or lunges can improve overall squat performance.

2. Addressing Muscle Imbalances

Muscle imbalances can hinder strength development. Accessory lifts can target weaker muscle groups, helping to correct these imbalances and ensure a more powerful and stable performance during compound lifts. For instance, strengthening the triceps can lead to improved bench press strength.

3. Improved Technique and Form

Accessory lifts can help improve the technique and form of primary lifts. By strengthening the supporting muscles, lifters can enhance their ability to perform compound movements more effectively. This not only contributes to better strength gains but also reduces the risk of injury.

Balancing Strength and Hypertrophy

1. Integrating Accessory Lifts

To maximize the benefits of both strength and hypertrophy, it’s essential to integrate accessory lifts into your training program strategically. A balanced approach might involve performing accessory lifts after your primary lifts or as part of a separate workout.

2. Programming Considerations

When programming accessory lifts, consider the following:

  • Repetitions and Sets: For hypertrophy, aim for higher repetitions (8-12) with moderate weights. For strength, lower repetitions (3-6) with heavier weights may be more effective.
  • Frequency: Incorporate accessory lifts into your routine 2-3 times a week, focusing on different muscle groups each session.

3. Listen to Your Body

Pay attention to how your body responds to accessory lifts. Adjust your program based on your goals, energy levels, and any signs of fatigue or overtraining.

Conclusion

Accessory lifts are not just supplementary; they play a vital role in both gaining strength and promoting hypertrophy. By incorporating these exercises into your training regimen, you can improve muscle imbalances, enhance stability, and increase overall performance in compound lifts. Ultimately, a well-rounded approach that includes both accessory and primary lifts will yield the best results for strength and muscle growth.

Do Elbow Straps Help You Lift More in Bench Press?

When it comes to boosting your bench press performance, many lifters turn to accessories like elbow straps. But do these straps actually help you lift more weight? Let’s explore how elbow straps function, their benefits, and their potential impact on your bench press.

What Are Elbow Straps?

Elbow straps are supportive devices, usually made of neoprene or elastic materials, designed to stabilize the elbow joint during lifting exercises. They offer compression and support, which can be particularly useful during bench pressing.

Do Elbow Straps Increase Bench Press Performance?

Yes, They Can Help You Lift More

  1. Joint Support: Elbow straps provide compression that stabilizes the elbow joint, which can enhance your ability to lift heavier weights, especially if you have previous injuries or discomfort.
  2. Improved Stability: By stabilizing your elbow, straps can help you maintain better form during the bench press. A stable elbow allows for a more efficient lift, potentially leading to heavier weights.
  3. Pain Relief: If you experience pain while bench pressing, elbow straps can alleviate discomfort, allowing you to focus on lifting more effectively.
  4. Boosted Confidence: Knowing your elbows are supported can improve your mental focus, which may encourage you to attempt heavier lifts.

Considerations and Limitations

While elbow straps can enhance your bench press, there are some important considerations:

  1. Avoid Over-Reliance: If you use elbow straps too frequently, you might become dependent on them, leading to a decrease in your natural strength and stability. Balance their use with strength training to maintain elbow health.
  2. Not a Replacement for Technique: Elbow straps can help, but they won’t substitute for good lifting technique. Focusing on form is crucial for maximizing your bench press performance.
  3. Individual Needs: Not every lifter requires elbow straps. If your elbows are strong and healthy, you might find them unnecessary.

When Should You Use Elbow Straps?

Consider using elbow straps in the following situations:

  • During Injury Recovery: If you’re recovering from an elbow injury or dealing with chronic pain, elbow straps can provide essential support.
  • On Heavy Lifting Days: Using elbow straps can boost your stability and confidence when attempting heavier weights.
  • For Technique Work: If you’re trying to refine your bench press form, straps can help reduce discomfort and allow you to focus on your technique.

Conclusion

In summary, elbow straps can help you bench press more effectively by providing support, stability, and pain relief. They can be particularly beneficial for those with existing elbow issues or those looking to lift heavier weights. However, they should not replace proper technique or be relied upon too heavily. If you think elbow straps could benefit you, consider incorporating them into your training wisely, while also focusing on building your natural strength and maintaining good form.

Barbell Rows vs. One-Arm Dumbbell Rows: Best Exercise?

When it comes to building a strong back, barbell rows and one-arm dumbbell rows are two popular exercises that can help you achieve your fitness goals. Both movements target the back muscles, but they do so in different ways and offer unique benefits. This article explores the differences between barbell rows and one-arm dumbbell rows, helping you decide which exercise might be better for your workout routine.

Understanding Barbell Rows

Barbell rows are a compound exercise that involves bending forward at the hips while pulling a barbell toward your torso. This movement primarily targets the upper back, including the lats, rhomboids, and traps, while also engaging the lower back, core, and biceps.

Benefits of Barbell Rows

  1. Compound Movement: Barbell rows engage multiple muscle groups, allowing for efficient strength building.
  2. Greater Weight Capacity: You can typically lift heavier weights with a barbell, which can lead to increased muscle mass and strength gains.
  3. Stability: The barbell provides a stable movement pattern, which can help maintain good form.
  4. Time Efficiency: Because they work multiple muscle groups simultaneously, barbell rows can be more time-efficient in a workout.

Understanding One-Arm Dumbbell Rows

One-arm dumbbell rows, often performed with a bench for support, involve pulling a dumbbell towards your hip with one arm while the other arm is stabilized on the bench. This unilateral movement emphasizes muscle control and balance.

Benefits of One-Arm Dumbbell Rows

  1. Muscle Imbalance Correction: Performing rows with one arm at a time allows you to identify and correct strength imbalances between sides.
  2. Increased Range of Motion: Dumbbells offer a greater range of motion, which can enhance muscle activation.
  3. Core Engagement: This exercise requires significant core stability, promoting overall core strength.
  4. Versatility: One-arm dumbbell rows can be performed almost anywhere, making them a flexible option for various workout environments.

Key Differences

  1. Stabilization: Barbell rows require more stabilization from your core and lower back, while one-arm dumbbell rows focus on balance and stability for one side of the body.
  2. Muscle Activation: While both exercises target the back, the one-arm dumbbell row often engages more stabilizing muscles due to the unilateral nature of the movement.
  3. Loading Potential: Barbell rows allow for heavier loading, which is beneficial for overall strength gains, whereas dumbbell rows may be more suitable for targeting specific muscle groups.
  4. Form and Technique: Barbell rows can be more challenging to master due to the required form, while one-arm dumbbell rows may be easier for beginners to perform correctly.

Which Exercise is Better for You?

The choice between barbell rows and one-arm dumbbell rows depends on your individual goals, experience level, and workout preferences. Here are some considerations:

  • For Strength Building: If your primary goal is to build strength and muscle mass, barbell rows may be more effective due to the ability to lift heavier weights.
  • For Muscle Imbalance Correction: If you’re looking to correct imbalances or improve coordination, one-arm dumbbell rows would be beneficial.
  • For Beginners: Beginners may find one-arm dumbbell rows easier to learn and execute, making them a good starting point.
  • For Overall Development: Including both exercises in your routine can provide a well-rounded approach to back training, enhancing overall strength and muscle development.

Conclusion

Both barbell rows and one-arm dumbbell rows are excellent exercises for building a strong and muscular back. Each has its own unique benefits, and the best choice ultimately depends on your specific fitness goals and needs. Consider incorporating both exercises into your routine to maximize your back training effectiveness, ensuring a balanced and strong upper body.

Chest Press Machine vs. Bench Press: What’s the Difference?

When it comes to strength training, the chest press machine and the bench press are two popular options for developing the pectoral muscles. Both exercises target the chest, shoulders, and triceps, but they differ in execution, benefits, and overall impact on your workout regimen. Let’s explore the similarities and differences between the chest press machine and the bench press.

Understanding the Chest Press Machine

The chest press machine is a piece of gym equipment designed to isolate the chest muscles while providing stability and control during the exercise. Users sit on the machine, adjust the seat height, and push a set of handles or a bar forward. The machine uses a guided path for the movement, which helps ensure proper form and reduces the risk of injury.

Benefits of the Chest Press Machine

  1. Safety and Stability: The machine’s design provides support, making it ideal for beginners or those recovering from an injury.
  2. Muscle Isolation: It allows for focused engagement of the chest muscles, minimizing the involvement of stabilizing muscles.
  3. Ease of Use: Adjusting the weights is straightforward, making it accessible for all fitness levels.
  4. Less Risk of Injury: The guided motion helps prevent improper form, reducing the likelihood of strains or injuries.

Understanding the Bench Press

The bench press, a free-weight exercise, involves lying on a bench and pressing a barbell (or dumbbells) away from the chest. This classic compound movement recruits multiple muscle groups, including the chest, shoulders, triceps, and even the core for stability.

Benefits of the Bench Press

  1. Functional Strength: The bench press mimics real-life pushing movements and engages stabilizing muscles, improving overall functional strength.
  2. Variety: It offers variations such as incline and decline presses, allowing for targeted training of different areas of the chest.
  3. Progressive Overload: Lifters can easily add weight, making it effective for building strength and muscle mass.
  4. Muscle Engagement: The need for stabilization during the lift activates more muscle fibers compared to the chest press machine.

Key Differences

  1. Equipment Type: The chest press machine is a fixed-path machine, while the bench press utilizes free weights, requiring more coordination and balance.
  2. Muscle Engagement: The bench press recruits additional stabilizing muscles, whereas the chest press machine focuses more on the chest and less on surrounding muscle groups.
  3. Skill Level: The chest press machine is often recommended for beginners, while the bench press may require more technique and experience to perform safely and effectively.
  4. Injury Risk: The chest press machine can be safer for individuals with limited experience or injury history, as it provides guidance and support.

Which One Should You Choose?

Ultimately, the choice between the chest press machine and the bench press depends on your fitness goals, experience level, and personal preferences. Here are some considerations:

  • For Beginners: The chest press machine can be an excellent starting point to build confidence and learn proper form before progressing to free weights.
  • For Muscle Building: If your goal is to increase muscle mass, incorporating both the chest press machine and the bench press can provide a well-rounded approach, as they target the chest in different ways.
  • For Functional Fitness: If you aim to improve functional strength and overall athletic performance, the bench press is likely the better choice, as it engages multiple muscle groups and promotes stability.

Conclusion

While the chest press machine and the bench press both serve the purpose of strengthening the chest, they do so in distinct ways. Each has its own set of benefits, and incorporating both into your workout routine can lead to a more comprehensive strength training program. Understanding the differences can help you make informed choices to achieve your fitness goals effectively and safely.

Advantages of Commercial-Grade Fitness Equipment at Home

Investing in commercial-grade fitness equipment for your home can significantly enhance your workout experience and overall health. Whether you’re a seasoned athlete or just starting your fitness journey, having access to high-quality, gym-level equipment can make a world of difference. Here are some key benefits of bringing commercial-grade fitness equipment into your home, along with popular brands to consider.

1. Enhanced Durability and Longevity

One of the primary advantages of commercial-grade equipment is its durability. Designed to withstand heavy use in commercial settings, this equipment is built with superior materials and engineering. As a result, you can expect it to last much longer than standard home-grade alternatives. Brands like Life Fitness and Precor are known for their robust construction, ensuring that your investment pays off over time.

2. Superior Performance

Commercial-grade equipment often comes with advanced features and technology that enhance performance. From smoother resistance mechanisms to better ergonomics, these machines provide a more effective workout. For instance, a commercial-grade treadmill from NordicTrack or Sole Fitness typically offers a more powerful motor and a more responsive deck, resulting in a smoother running experience compared to home-grade models.

3. Versatility and Variety

Many commercial-grade machines offer a range of functionalities, allowing you to perform multiple exercises with one piece of equipment. For example, a multi-gym machine from Hammer Strength can enable you to perform various strength training exercises, saving both space and money. This versatility helps you diversify your workouts and target different muscle groups more effectively.

4. Increased Motivation

Having commercial-grade equipment at home can significantly boost your motivation to work out. The professional feel of high-quality machines creates an atmosphere similar to that of a gym, making your home workouts more enjoyable. Brands like Matrix Fitness and Cybex provide a sleek, gym-like aesthetic that encourages consistent exercise.

5. Cost-Effectiveness in the Long Run

While the initial investment in commercial-grade equipment may be higher than standard home fitness equipment, it can save you money over time. You’ll avoid ongoing gym membership fees and won’t need to frequently replace cheaper equipment. Over the years, the financial benefits can outweigh the initial costs, particularly when investing in brands like Bowflex, known for their durable and innovative products.

6. Convenience and Accessibility

One of the most significant benefits of having commercial-grade equipment at home is convenience. You can work out on your own schedule, without the need to commute to a gym. This accessibility makes it easier to fit exercise into your day, especially for those with busy lifestyles or family commitments.

7. Privacy and Comfort

Working out at home offers a level of privacy and comfort that public gyms may not provide. You can exercise without feeling self-conscious or distracted, allowing you to focus entirely on your workout. This can be particularly beneficial for beginners who may feel intimidated in a gym setting.

8. Customization to Your Needs

Investing in commercial-grade equipment allows you to tailor your home gym to fit your specific fitness goals. You can choose equipment that aligns with your interests, whether that’s strength training, cardio, or flexibility. Popular brands like Rogue Fitness and True Fitness offer a range of options to ensure your workouts remain engaging and effective.

9. Enhanced Safety Features

High-quality commercial-grade equipment often comes with better safety features, reducing the risk of injury. For example, commercial machines from Technogym may include safety locks, adjustable settings, and ergonomic designs that promote proper form. This added safety can provide peace of mind, especially for those new to exercising.

Conclusion

Purchasing commercial-grade fitness equipment for your home is an investment that can yield numerous benefits, from increased durability and performance to enhanced motivation and convenience. By creating a dedicated workout space with high-quality gear from reputable brands, you can take control of your fitness journey and work towards your goals in a comfortable, efficient environment. Whether you’re looking to build strength, improve cardiovascular health, or simply stay active, commercial-grade equipment can make all the difference. Consider exploring options from brands like Life Fitness, NordicTrack, and Hammer Strength to find the right fit for your home gym.

How to Build Muscle Naturally: A Simple Guide

Achieving a bigger, more muscular physique naturally is a goal for many fitness enthusiasts. Whether you’re a beginner or someone looking to refine your approach, the process requires a balanced combination of diet, exercise, and recovery. Here’s a simple guide to help you on your journey.

1. Set Clear Goals

Before diving in, it’s crucial to define your goals. Are you looking to build muscle, gain strength, or improve your overall physique? Establishing specific, measurable, achievable, relevant, and time-bound (SMART) goals will provide you with direction and motivation.

2. Nutrition: Fueling Your Body

a. Caloric Surplus

In order to gain muscle mass, you need to consume more calories than your body burns. This is known as a caloric surplus. Start by calculating your Total Daily Energy Expenditure (TDEE) and aim to exceed it by about 250-500 calories per day. This surplus will provide your body with the energy needed to build new muscle.

b. Macronutrients

Focus on a balanced intake of macronutrients:

  • Proteins: Aim for about 1.2 to 2.2 grams of protein per kilogram of body weight. Great sources include lean meats, eggs, dairy, legumes, and plant-based proteins.
  • Carbohydrates: Essential for energy, particularly during workouts. Complex carbs like whole grains, fruits, and vegetables should be your go-to.
  • Fats: Healthy fats from sources like avocados, nuts, seeds, and olive oil are vital for hormone production and overall health.

c. Meal Timing

Consider spreading your meals throughout the day. Eating every 3-4 hours can help maintain energy levels and support muscle repair and growth. Post-workout nutrition, including a mix of protein and carbs, is particularly important for recovery.

3. Strength Training: The Foundation

a. Resistance Training

Incorporate resistance training into your routine at least 3-5 times a week. Perform compound movement exercises that engage multiple muscle groups, such as:

  • Squats
  • Deadlifts
  • Bench Press
  • Pull-Ups
  • Rows

These exercises promote overall growth and strength. Gradually increase the weights and vary your routine to avoid plateaus.

b. Progressive Overload

To continually challenge your muscles, implement progressive overload. You can do this by gradually increasing the weight, sets, or amount of repetitions. Keep track of your progress to ensure you’re consistently pushing your limits.

4. Recovery: The Overlooked Component

a. Rest Days

Muscles grow during recovery, not during workouts. To give your body time to renew and heal, plan regular rest days. This can include light activities like walking or yoga to promote blood flow without overexertion.

b. Sleep

Aim for 7-9 hours of quality sleep each night. Sleep is crucial for muscle recovery, hormone regulation, and overall health. To increase your quality of sleep, establish a consistent sleep routine.

5. Hydration

Maintaining sufficient hydration is essential for peak performance and recovery. Aim for at least 2-3 liters of water daily, adjusting for activity level and climate. Dehydration can impair strength and endurance, so keep a water bottle handy throughout the day.

6. Supplement Wisely

While it’s best to obtain nutrients from whole foods, certain supplements can support your goals. Consider:

  • Protein Powder: Helpful for meeting daily protein goals.
  • Creatine: May improve strength and muscle mass.
  • Branched-Chain Amino Acids (BCAAs): Can support recovery and reduce muscle soreness.

It’s essential to talk to a healthcare professional or a registered dietitian before starting any supplement regimen, particularly if you have underlying health conditions. They can offer practical, personalized advice to suit your specific needs.

7. Stay Consistent and Patient

Building muscle naturally takes time and dedication. Stay consistent with your training and nutrition, and be patient with your progress. It’s essential to celebrate small victories along the way and adjust your approach as needed.

Conclusion

Getting bigger naturally is a holistic process that requires commitment to your diet, exercise routine, and recovery practices. By setting clear goals, focusing on nutrition, engaging in effective strength training, and prioritizing recovery, you’ll be well on your way to achieving the physique you desire. Remember, every individual’s journey is unique, so find what works best for you and enjoy the process!